How To Insert YouTube Videos In Your Blog
Here's how to insert YouTube videos in your Blogger.com blog - madali lang po! Here's the step-by-step tutorial...
Step 1: Log into Blogger.com and create a new blog post (see the Profitable Blogging Guide for details) and go to HTML mode.
Step 2: Open a new tab in your browser (in Firefox, press Ctrl+T to) and visit the webpage of a YouTube video. For example - http://www.youtube.com/watch?v=EkbAIo4V8HE
Step 3: Click on the Share button (see screenshot below):

Step 4: Click the Embed button, enter 500 in the width box, then highlight and Copy the IFRAME code (see screenshot below):
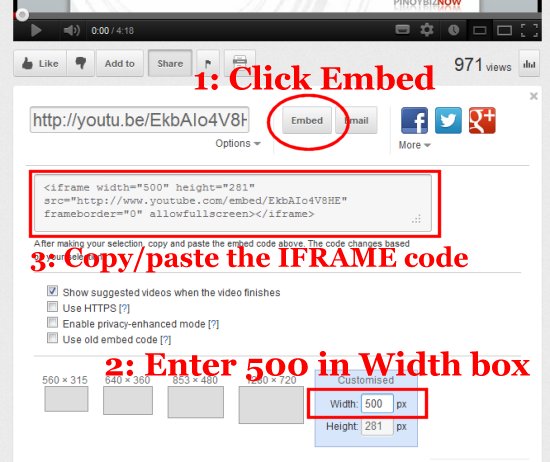
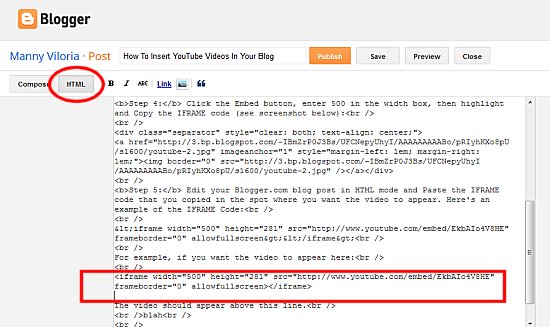
Step 5: Edit your Blogger.com blog post in HTML mode and Paste the IFRAME code that you copied in the spot where you want the video to appear.
Here's an example of the IFRAME Code:
<iframe width="500" height="281" src="http://www.youtube.com/embed/EkbAIo4V8HE" frameborder="0" allowfullscreen></iframe>
And here's where you might want to copy/paste the code (see screenshot):
Here's an example of the IFRAME Code:
<iframe width="500" height="281" src="http://www.youtube.com/embed/EkbAIo4V8HE" frameborder="0" allowfullscreen></iframe>
And here's where you might want to copy/paste the code (see screenshot):
For example, if you want the video to appear here:
The video should appear above this line.
Napakadaling mag-add ng YouTube video sa inyong blog post sa Blogger.com, di ba?